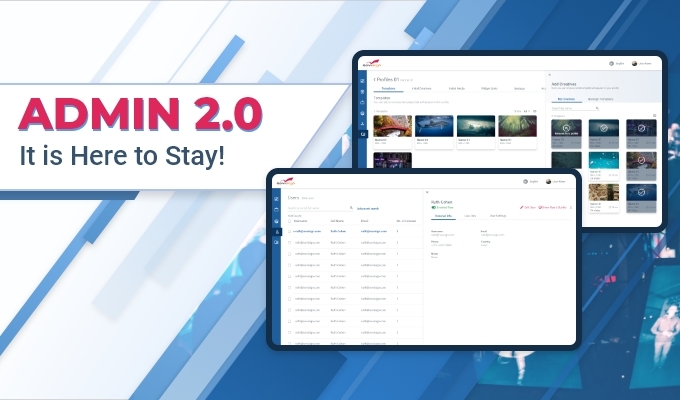
 This user guide will explain you of how to use the new Admin 2.0 tool (HTML5 based), which replaced the old flash-based Management Console tool.
The Admin and Management Console tools are tools for partners to allow partners to manage their subdomain and users.
The main purposes of the tool are:
- Manage users (create, edit and delete).
- Simulate login into any of the user accounts under your subdomain
- Manage your accounts, including special accounts to be used by multiple users.
- Customize your Studio by using profiles, where you can customize the links (under the YouTube, RSS and MRSS widgets), the initial creatives (that appear in each new created account), the initial media (the media which appears under the Media Library in each new created account), the templates (which appear after pressing the “Create from Template”) and other settings as well.
IMPORTANT: please notice that the license management that used to be for users (by entering a user’s record in edit mode and changing the players number) has moved into the Accounts module, since we now support multiple accounts per user and the right place for assigning licenses should be the account (as by default every user has its own private default account that comes with it). To learn more about the separation we did between users and accounts, please read this tech post.
How to access the Admin 2.0 tool?
The URL to access your new Admin tool will be your subdomain with HTTP and “/admin/” in the end of the URL. That means, for example, if your white label subdomain was http://studio.mydomain.com, then the admin tool URL will be https://studio.mydomain.com/admin/ (please notice that it will start with “https” and not “http“, no matter what prefix your subdomain has). You will then have to login with your managing user (also called “admin user”) of your subdomain. You can also login to the Admin tool with any user which was defined as “support” user – then that user will have limited access to most of the features of the Admin tool.
Lastly, the Admin tool can be accessed if you click the “Manage” menu option in the menu you have in your Studio account (the menu which opens when you click your name in the top right corner of your Studio account). This option appears only for you managing user (other users will not have this option in their account).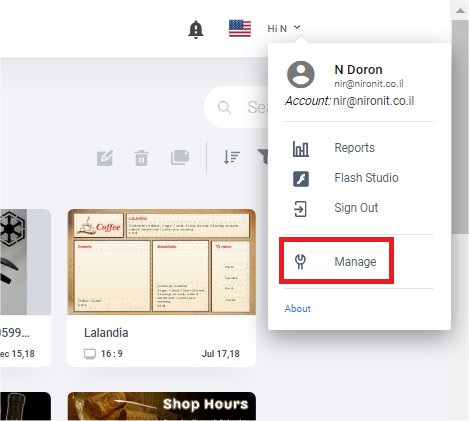
Users module
In this module you can manage your users. Anyone who wants to login to the Studio CMS must have a username. In this module, you can:
- Create a new user (other option is to allow self registration – that means people will be able to sign up to your branded Studio by themselves using a self registration page).
- Delete an existing user.
- View all the information related to any of your users.
- Simulate login as a user (that means you enter the Studio and get to see what that user sees when s/he logs into the system).
- Switch into any of the accounts which this user has access to.
- Edit basic information of the user and add notes, including password changes (here is a tutorial video for that).
- Change the role or type of the user.
- Change permissions of the user (here is a tutorial video for that).
- Assign account(s) to a user.
- Assign events to a user.
Accounts module
In this module you can manage your accounts. Every user has his/hers own private account which is automatically created when the user is created and usually has the same name like the username. However, you can also manually create special accounts: accounts, which their purpose is to be shared by more than one user (i.e. for a certain project). Also, any private account can be shared with other users if necessary (here is a tutorial video for that). In this module, you can:
- Create a new account and assign it a managing user (here is a tutorial video for how-to assign multiple users to an account).
- Delete an existing account (this is a future option).
- View all the information related to any of your accounts.
- Switch into any of the users which this account was assigned to.
- Edit basic information of the account.
- Change the managing user of the account and assign it to other user(s).
- Change the billing (licenses) information of any account (here is a tutorial video for how-to assign licenses).
- Alter the storage and maximum file upload size of any account. Here is a how-to video.
- Enable the statistics collecting (for the proof-of-play reports)
Profiles module
In this module you can add some flavor, that means to customize the Studio for your users. The concept is based over profiles. You decide how a profile will be and look like and then you assign the profile to any of your accounts. You may have multiple profiles. Each account may be related to only one profile. You can also set a default profile, so once you create a user (or if you have self registration, people can sign up by themselves for a new user), that user (or actually, its private account generated upon its creation) will have that default profile. In this module, you can:
- Create, edit and delete profiles.
- Create templates (here is a tutorial video for how to add a template), initial creatives, initial media, widget links (i.e. YouTube, RSS and MRSS URLs which you see as predefined links in the Creative Composer when you use those widgets) and assign or unassign them to any of your profiles.
- Create basic settings (such as showing/hiding some of the widgets in the Creative Composer) and assign or unassign them to any of your profiles.
- Observe the accounts which have a certain profiles assigned to them.
Users module – how to?
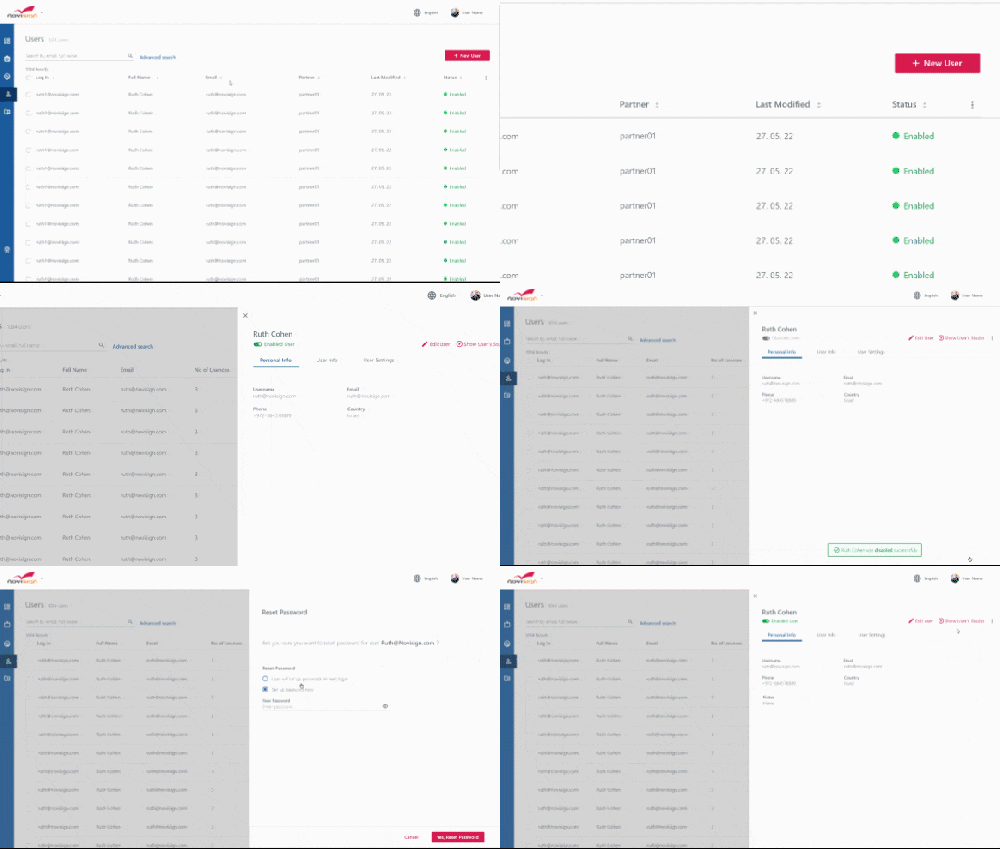
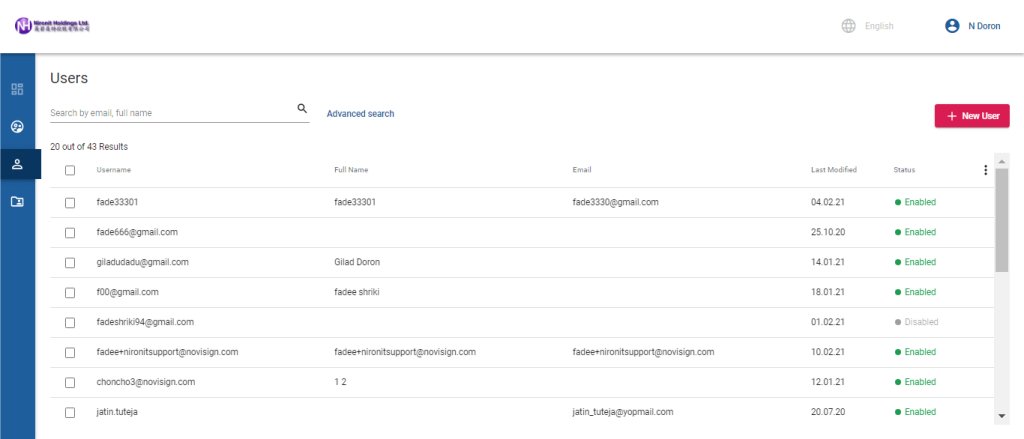
- After entering this module by clicking the Users menu option in the left menu of the Admin tool, in the top bar, you can search for a certain user by typing few letters. You also have an advanced search – for that, just click the “Advanced search” link.
- You can also manually create a new user by pressing the “+ New User” red button in the op right corner of the tool. Doing so, will take you step-by-step till the new user is created.
- In the main window of the Users module you have a grid which contains the existing users you already have under your subdomain. The grid shows you basic information. You can also customize the grid by clicking the 3 dots in the top right corner of the grid. Sorting the grid (ascending or descending) is being done by clicking any column header once or twice.
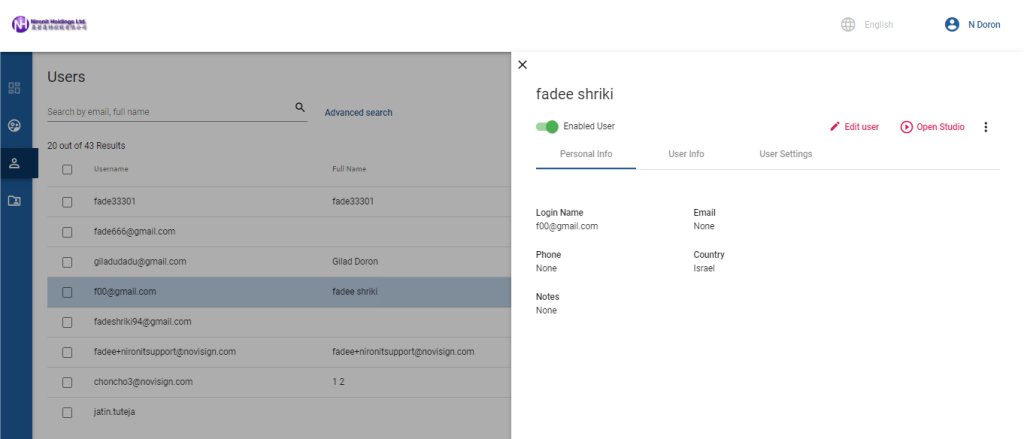
Users module in action - In order to enter a user’s record, just click anywhere on the row of that user. on the right half of the screen, the user record pane will be opened.
- While inside a user’s record, you’re in view mode. You will have 3 tabs of information, the first 2 are information and the 3rd one is the user’s settings. Only in view mode of the user’s record you can easily switch into any of the related accounts of that user, by clicking the “View” link/icon in the row where the account you’d like to enter is (under “Accounts” in the “User Settings” tab).
- While in view mode of the user’s record, there are few more actions you can take, such as simulating the user (which means entering the Studio CMS and see what he or she sees) – that is done by clicking the “Open Studio” red link on the top right corner of the user’s record pane. You can also click the 3 dots link (also on the top right corner of the user’s record pane) and choose one of the options there, such as resetting this user’s password in 3 different ways.
- Another option you have in view mode is to disable or enable the user (disabling a user will prevent him from logging into the online Studio) and that can be done by toggling the circle near the “Enable User” text on the top of the pane.
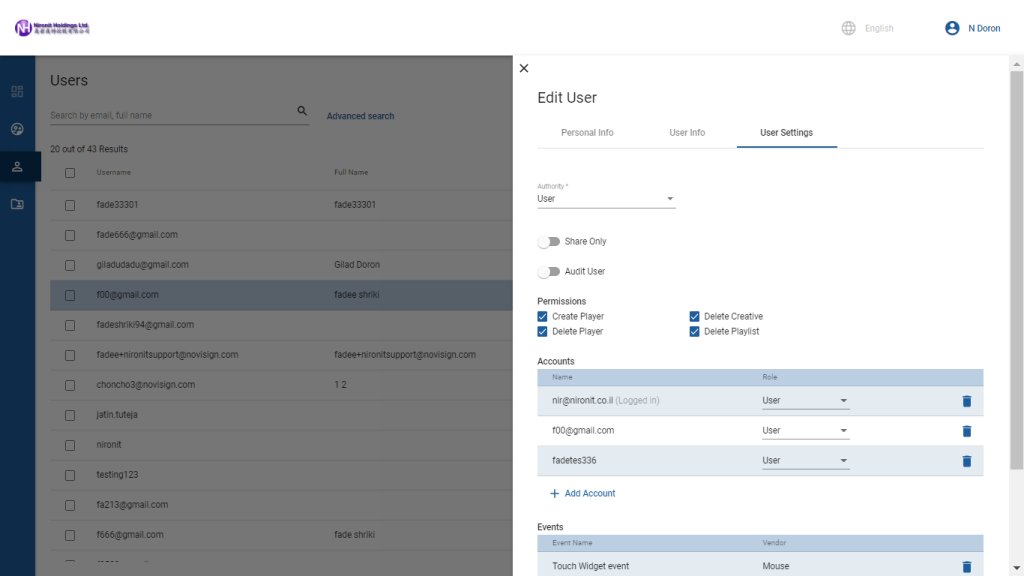
Users module record - Once you click the “Edit User” red link, you’ll be able to edit the information and settings of the user. The editable information is under the “Personal Info” tab, while the settings are under the “User Settings” tab.
- Under the “User Settings” tab in edit mode, you can change the user type: change it from “User” to “Support”, in order to allow it limited access to the Admin tool; you can also turn it into “Share Only” user or “Audit User”.
- Under the “User Settings” tab in edit mode, you can set permissions to the user. The permissions are set of checkboxes under the word “Permissions”. Every new user has all the permissions there, but you can use those permissions to prevent the user from creating a screen (player), deleting a screen (player), deleting a creative and deleting a playlist.
- Under the “User Settings” tab in edit mode, you can assign accounts to this user and also set the role for the accounts which you have set for it. The 2 available roles are “User” (means that once the user enters that account, s/he will be able to do whatever s/he likes within that account) and “View only” (means that once the user enters that account, s/he will be able only to see what is the account and won’t be able to change (create, edit and delete) anything in that account.
- Under the “User Settings” tab in edit mode, you can assign events to that account. Using the events engine, you can trigger any creative by an external HTTP or keyboard event. RFID events (when integrating RFID reader with an Android box) is a good example for using events.
Users module edit mode of a record
Accounts module – how to?
- In the top bar, you can search for a certain account by typing few letters. You also have an advanced search – for that, just click the “Advanced search” link.
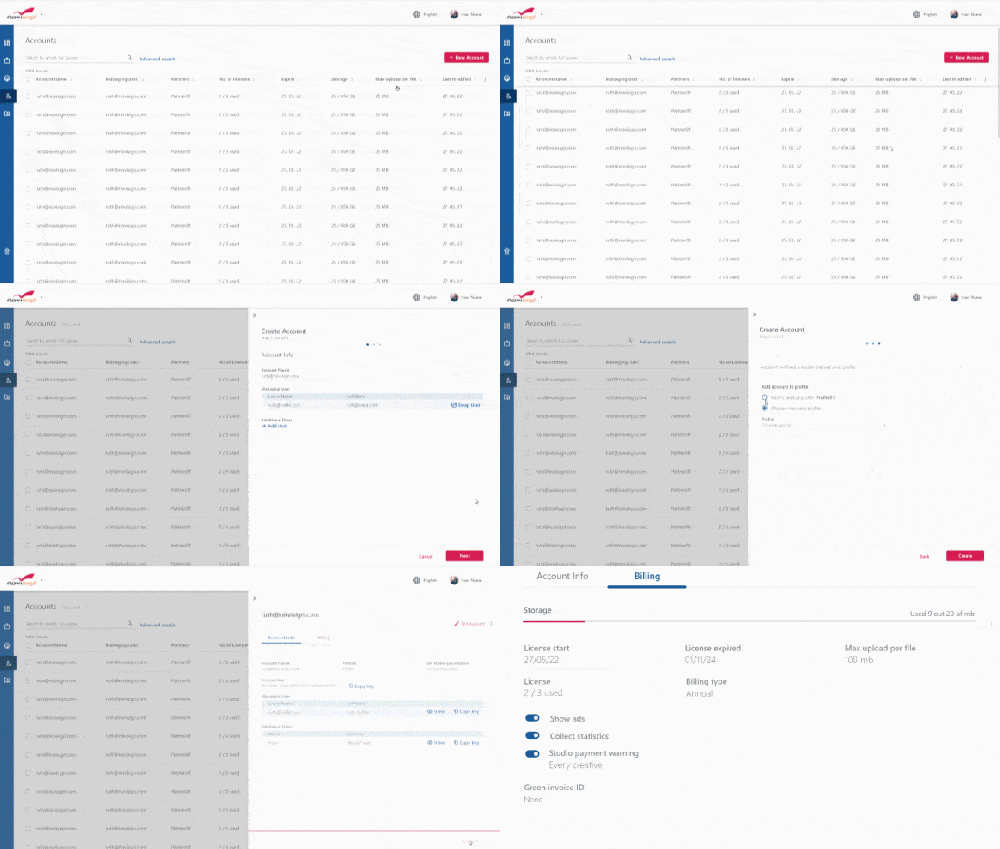
- You can also manually create a new account by pressing the “+ New Account” red button in the op right corner of the tool. Doing so, will take you step-by-step till the new account is created.
- In the main window of the Accounts module you have a grid which contains the existing accounts you already have under your subdomain. The grid shows you basic information. You can also customize the grid by clicking the 3 dots in the top right corner of the grid. Sorting the grid (ascending or descending) is being done by clicking any column header once or twice.
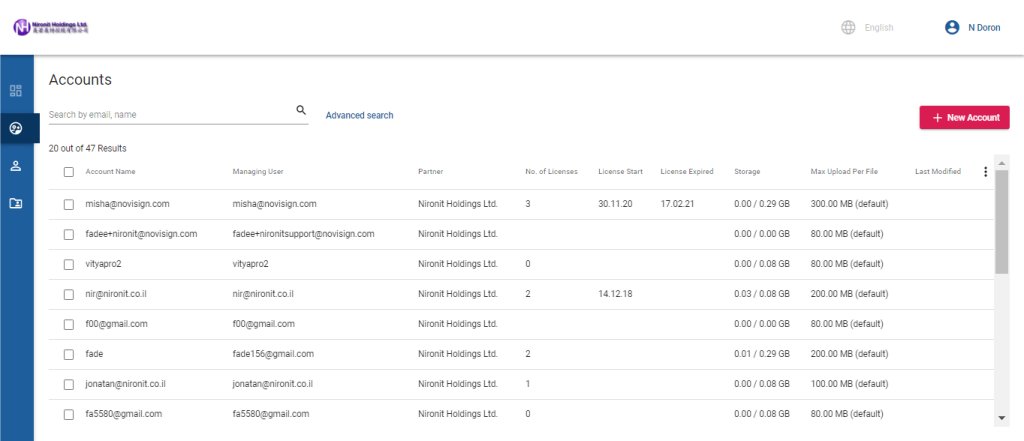
Accounts module in action - In order to enter a account’s record, just click anywhere on the row of that account. on the right half of the screen, the account record pane will be opened.
- While inside a account’s record, you’re in view mode. You will have 2 tabs of information, the first one is information and the 2nd one is the account’s settings. Only in view mode of the account’s record you can easily switch into any of the related users of that account, by clicking the “View” link/icon in the row where the user you’d like to enter is (under “Managing User” and “Account Users” in the “Account Info” tab).
- While in view mode of the account’s record, there will soon be are few more actions which you can take: they will be accessible through the 3 dots link menu (in the top right corner of the account’s record pane).
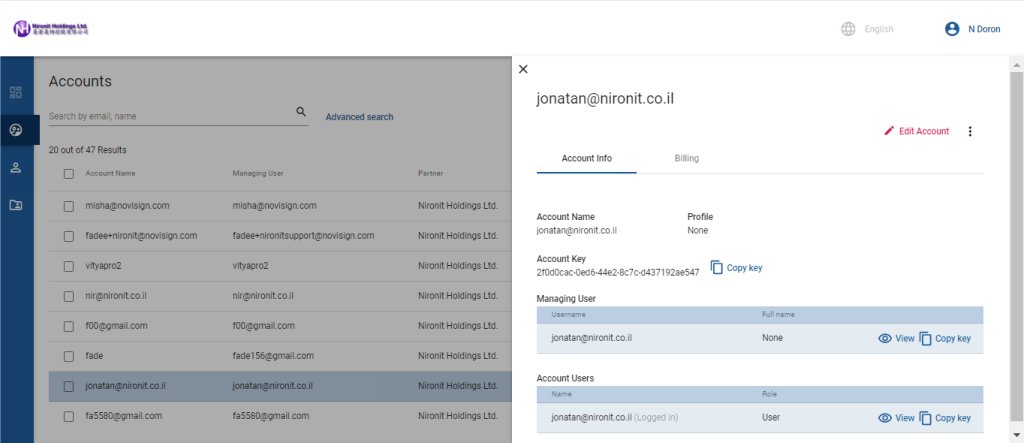
Accounts module record - Once you click the “Edit Account” red link, you’ll be able to edit the information and settings of the account. Some of the information is under the “Account Info” tab, while the other settings are under the “Billing” tab.
- Under the “Account Info” tab in edit mode, you can change the account name (usually the account name is identical to the user name, in case this account was automatically created when a user was created); you can assign it a profile (only one at a time); You can also change the managing user of this account by pressing the “Swap User” button (that decides who will be the owner of this account – for each account there ca be only one owner at a time); you can also grant or revoke access to other users (there are 2 roles you can choose from: “User” which has full access and “View only” which has read-only access).
- Under the “Billing” tab in edit mode, you can set other settings for the account, such as the amount of licenses to be assigned to this account, the start and end (expiration) date of the licenses, also maximum file upload size (usually if there is one license with valid start date and expiration date, then the default will be 100MB, 2 licenses and the default will be 300MB, 3 licenses – 400MB and so on, but not more than 500MB; if there is no license, the default will be 16MB). The amount of storage you’d like to assign to this account should be set here(remember: you can assign the storage you have any way among your accounts; the storage you get from us is 500MB multiply the amount of licenses you have).
- Under the “Billing” tab in edit mode, you can also turn on the “Collect statistics” option. This will allow you to collect statistics to be displayed in the proof-of-play reports under this account.
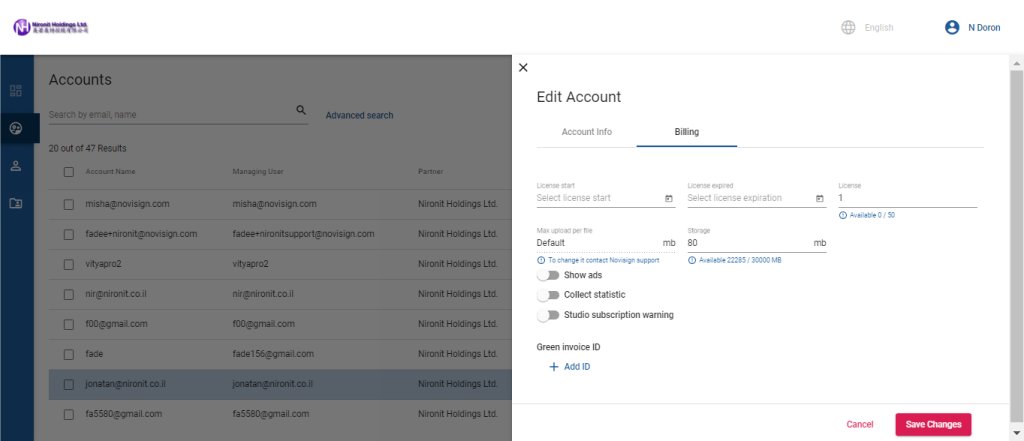
Accounts module edit mode of a record
Profiles module – how to?
- In the top bar, you can search for a certain profile by typing few letters. You also have an advanced search – for that, just click the “Advanced search” link.
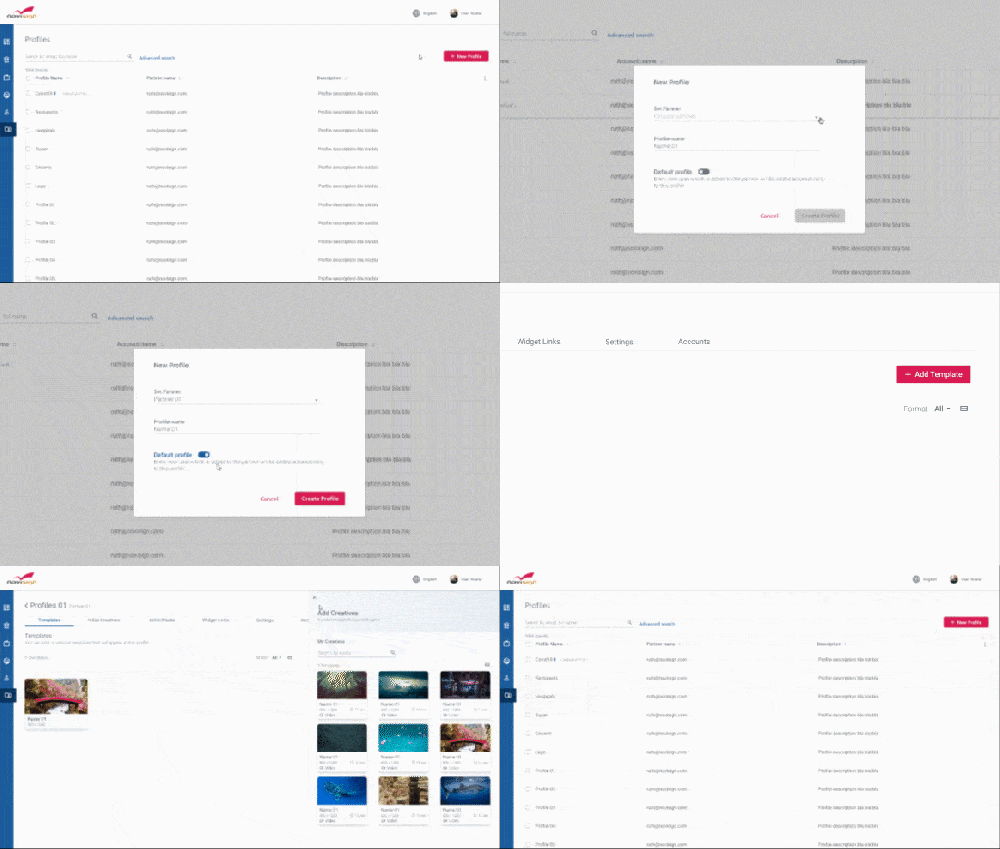
- You can also manually create a new profile by pressing the “+ New Profile” red button in the op right corner of the tool. Doing so will create a new profile.
- In the main window of the Profiles module you have a grid which contains the existing profiles you already have under your subdomain. The grid shows you basic information. You can also customize the grid by clicking the 3 dots in the top right corner of the grid. Sorting the grid (ascending or descending) is being done by clicking any column header once or twice.
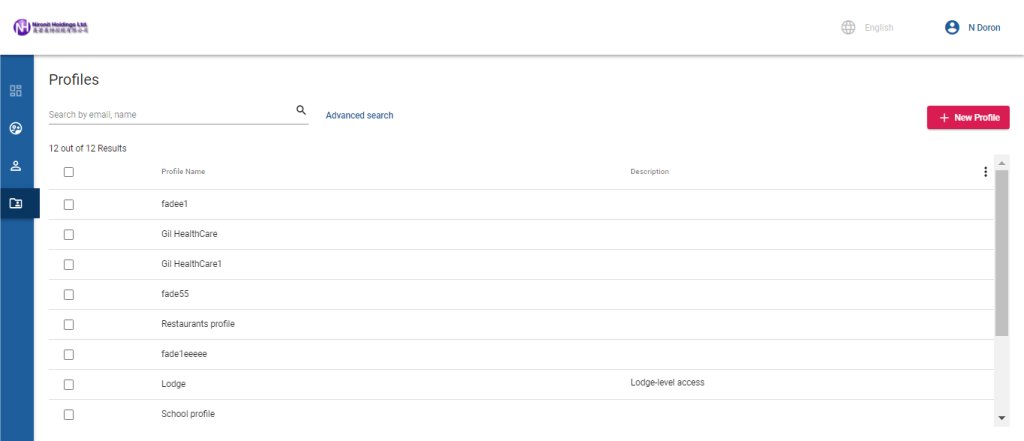
Profiles module in action - In order to enter a profile’s record, just click anywhere on the row of that profile. on the right half of the screen, the profile record pane will be opened.
- While inside a profile’s record, you’ll see 6 tabs: Templates, Initial Creatives, Initial media, Widget Links, Settings and Accounts. Each of the first 5 tabs is responsible of some customization of the profile. The last tab, the “Accounts” is where you assign the current profile to existing accounts. Once a profile was assigned to an account, that account will behave according the profile settings. If you set one of your profiles (you can set only one) to be the default profile, then every new user (either by manual creation of by self registration) will get that default profile.
- At the moment the 4 tabs Initial Creatives, Initial media, Widget Links and Settings are under construction and will soon be added.
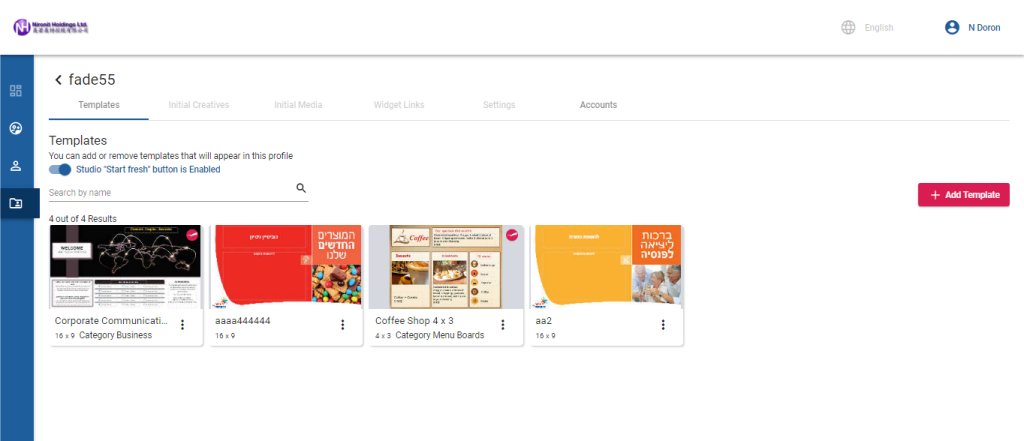
Profiles module record - The “Templates” tab allows you to set which templates will appear when anyone who has this profile presses the “Create from Template” button in the Studio, in order to create a composed creative. The set of templates which appears there is defined here. You can add templates from NoviSign library (templates which available for any non-partner user) or templates based on creative from you managing user of this subdomain. It is done by pressing the red “+ Add Template” button in the right side of the screen. Once you have templates assigned to this profile, you can click the 3 dots link menu on a certain assigned template and then edit the template ,remove it or put it under a category (so your templates will be divided into categories).
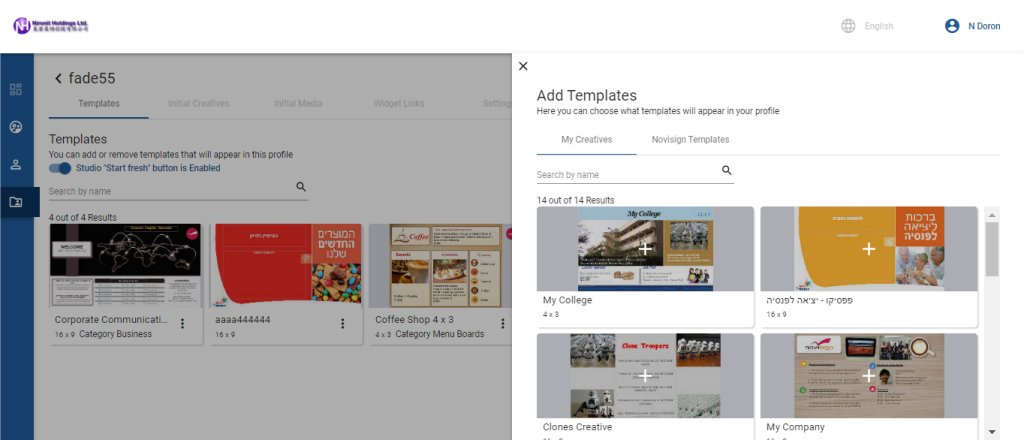
Profiles module – adding new templates - The “Initial Creatives” tab allows you to add creatives to appear in any new account once it’s created, so when one enters that account s/he will see those pre-prepared creatives in the Creatives tab in the Studio (if you apply a profile with this on an existing account, those creatives will not appear in that account, since it affects only accounts which were created with this profile at the moment of creation). This tab is under construction and will soon be available.
- The “Initial Media” tab allows you to add media items (images and videos) to appear in any new account once it’s created, so when one enters that account in the Studio and accesses the Media Library, s/he will see those pre-prepared media items there (if you apply a profile with this on an existing account, those media items will not appear in that account, since it affects only accounts which were created with this profile at the moment of creation). This tab is under construction and will soon be available.
- The “Widget Links” tab allows you to set URLs in the YouTube, RSS and MRSS widgets in the Creative Composer. They will appear as pre-prepared link there. This tab is under construction and will soon be available.
- The “Settings” tab allows you to alter settings such as showing or hiding widget(s). This tab is under construction and will soon be available.
Create your own world here,
The “Dude” Nir.
